How to Make API Requests with Postman or cURL
Postman is an API testing environment. cURL is a command line tool for transfering data via URLs. When it comes to REST APIs, we can use Postman as a GUI (graphical user interface) and cURL as a CLI (command line interface) to do the same tasks.
Prerequisites
If you don't yet understand REST or know how to use REST APIs, please read Understanding REST and REST APIs.
Goals
I'm going to demonstrate how to do GET, POST, PUT, PATCH, and DELETE requests via Postman and cURL. If you don't have Postman, simply download it from the website. cURL should already be installed in your macOS or Linux environment.
Endpoints
I'm going to use JSON Placeholder, an awesome example site for testing API calls. You can follow along and paste all the commands into your terminal to see what response you get.
Here is the map of methods to endpoints we'll be using. /posts means all, and the 1 in /posts/1 represents /posts/{id}, so ID number1.
You can click those URLs to see the GET values they provide to the browser. You can use the browser for GET, but you'll have to use cURL or Postman to POST, PUT, PATCH or DELETE.
cURL CLI arguments
Here are a few cURL argument we'll pass with our requests. All requests will simply be curl followed by the argument and data to pass.
curl-X --request- Custom request method-d --data- Sends the specified data-H --header- Sends headers-i --include- Display response headers
GET
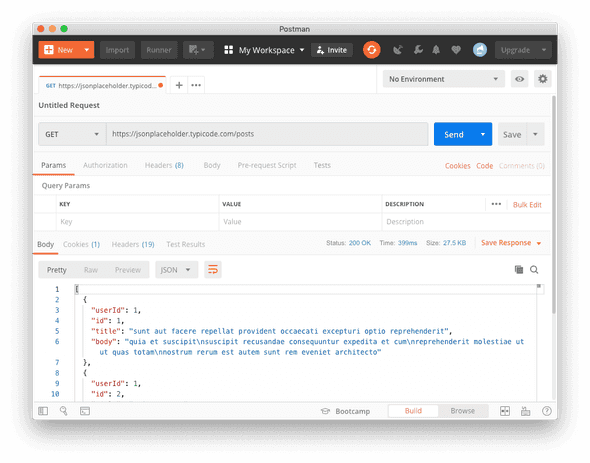
GET retrieves data.
curl https://jsonplaceholder.typicode.com/postsYou can also use
curl -ito get more information from the headers.
All you have to do for Postman is paste the URL, select GET, and send.
POST
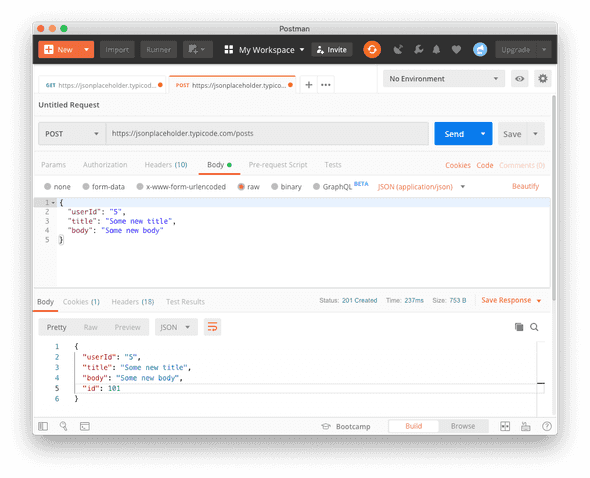
POST creates a new resource. It is non-idempotent, meaning that two identical POST requests will create two new resources.
curl -X POST -d "userId=5&title=Stuff and Things&body=An amazing blog post about both stuff and things." https://jsonplaceholder.typicode.com/postscurl -X POST -H "Content-Type: application/json" -d '{"userId": 5, "title": "Stuff and Things", "body": "An amazing blog post about both stuff and things."}' https://jsonplaceholder.typicode.com/postsThere are two ways to do this via Postman. After selecting POST, you can go to Body, select x-www-form-urlencoded, and type each individual value in. If you go to Headers, you'll see Content-Type: application/x-www-form-urlencoded.
Or you can go to Body, select raw, select JSON, and send the actual JSON you intend to send. If you go to Headers, you'll see Content-Type: application/json.
PUT
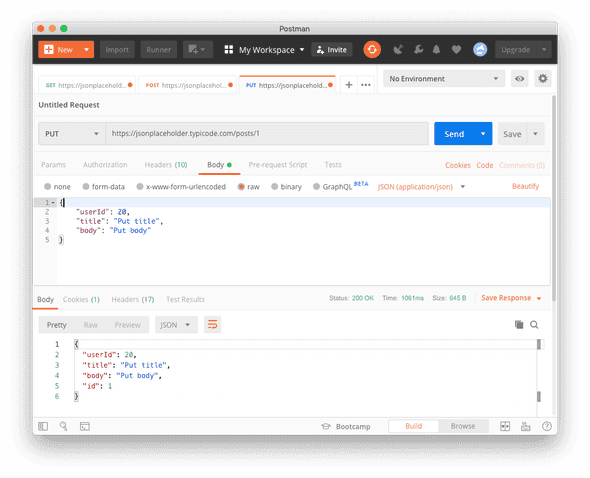
PUT updates an existing resource. It is idempotent, meaning that two identical PUT requests will modify the same resource. A PUT request requires the entire body to be sent through; if any data is missing, that data will be wiped (except automatic values like auto-incrementing IDs and timestamps).
curl -X PUT -d "userId=1&title=Something else&body=A new body" https://jsonplaceholder.typicode.com/posts/1curl -X PUT -H "Content-Type: application/json" -d '{"userId": 1, "title": "Something else", "body": "A new body"}' https://jsonplaceholder.typicode.com/posts/1Sending the values is the same as with POST.
PATCH
PATCH updates an existing resource, and does not require sending the entire body with the request.
curl -X PATCH -d "title='Only change the title'" https://jsonplaceholder.typicode.com/posts/1curl -X PATCH -H "Content-Type: application/json" -d '{"title": "Only change the title"}' https://jsonplaceholder.typicode.com/posts/1No change to sending the values.
DELETE
DELETE removes a resource.
curl -X DELETE https://jsonplaceholder.typicode.com/posts/1No values to send.
Authentication
If you need to send additional headers, like Authorization: Bearer or x-jwt-assertion for JWT-based authentication, you can do it through cURL like this.
curl \
  -H "Content-Type: application/json" \
  -H "Authorization: Bearer <JWT_TOKEN>" \
  -H "x-jwt-assertion: <JWT_TOKEN>" \
  -X POST \
  -d  '{"key1" : "value1", "key2" : "value2"}' \
  https://example.com/
In Postman, you'll go to Headers and add Authorization as the key and Bearer <JWT_TOKEN> as the value to send authentication values. You can also go to Headers, click Presets, Manage Presets, and put your own reusable variables in for any headers or values you'll be reusing a lot.
Conclusion
This guide provides all the basics for getting started with testing your APIs, either through Postman's GUI or cURL's CLI, using JSON or urlencoded form data.


Comments